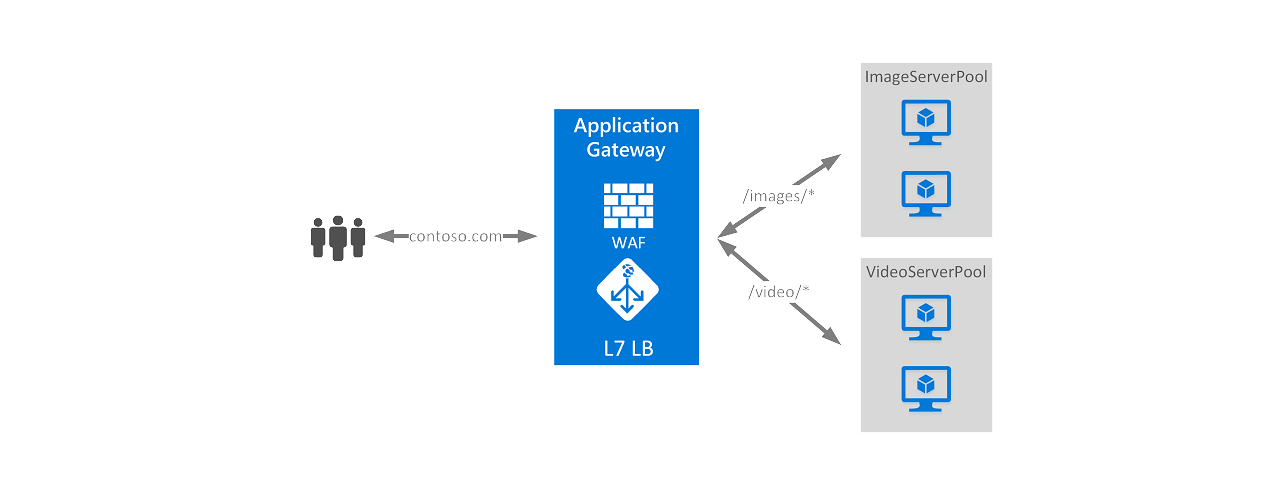

Azure Application Gateway is a web traffic load balancer that enables you to manage traffic to your web applications. Traditional load balancers operate at the transport layer (OSI layer 4 – TCP and UDP) and route traffic based on source IP address and port, to a destination IP address and port.
Prerequisites
- The NSG on the Application Gateway subnet and the backend server is allowing inbound access to ports 65503-65534 (v1 SKU) or 65200-65535 (v2 SKU) from “Internet.”
- The NSG on the Application Gateway subnet and backend server subnet must allow port 443 from any source.
- The User Defined Route (UDR) on the Application Gateway subnet is set to the default route (0.0.0.0/0) and the next hop is specified as “Internet.”
- The Application Gateway Subnet must be associated with the UDR.
- The next of the public IP address range of the Application Gateway must be specified as “Internet.”
- The Application Gateway must not connect a virtual network which as a default route advertised by an ExpressRoute/VPN connection to a virtual network over BGP.
- The custom DNS server is configured on a virtual network that must resolve public domain names.
- For a public IP, you can create a new public IP address or use an existing public IP in the same location as the application gateway.
- For a private IP, you can specify a private IP address from the subnet where the application gateway is created.
- You configure SSL policy to control SSL protocol versions. You can configure an application gateway to deny TLS1.0, TLS1.1, and TLS1.2. Leave it default.
This guide blogpost shows you how to use the Azure portal to create an application gateway. After creating the application gateway, you test it to make sure it’s working correctly. This article assume that you already have a Resource Group, vNet, a backend Windows IIS server and a Subnet dedicated for Application Gateway. You have created Route Table is if you have UDR. You have created NSG and associated ACL.
- On the Basics tab, enter these values for the following application gateway settings:
- Resource group: Select myResourceGroupAG for the resource group. If it doesn’t exist, select Create new to create it.
- Application gateway name: Enter myAppGateway for the name of the application gateway.
- For Azure to communicate between the resources that you create, it needs a virtual network. Application Gateway instances are created in separate subnets. You create two subnets in this example: one for the application gateway, and another for the backend servers.
- Under Configure virtual network, Select virtual network> Select Application Gateway Subnet
- On the Basics tab, accept the default values for the other settings and then select Next: Frontends.
Frontend Tabs
- On the Frontends tab, verify Frontend IP address type is set to Public. You can configure the Frontend IP to be Public or Private as per your use case. In this example, you’ll choose a Public Frontend IP.
- Choose Create new for the Public IP address and enter myAGPublicIPAddress for the public IP address name, and then select OK.
- Select Next: Backends.
Note: For the Application Gateway v2 SKU, you can only choose Public frontend IP configuration. Private frontend IP configuration is currently not enabled for this v2 SKU.
Backend Tabs
Note: For the Application Gateway v2 SKU, you can only choose Public frontend IP configuration. Private frontend IP configuration is currently not enabled for this v2 SKU.
- On the Backends tab, select Add a backend pool.
- In the Add a backend pool window that opens, enter the following values to create an empty backend pool:
- Name: Enter myBackendPool for the name of the backend pool.
- Add backend pool without targets: Select Yes to create a backend pool with no targets. You’ll add backend targets after creating the application gateway.
- In the Add a backend pool window, select Add to save the backend pool configuration and return to the Backends tab.
- On the Backends tab, select Next: Configuration.
Configuration Tab
On the Configuration tab, you’ll connect the frontend and backend pool you created using a routing rule.
- Select Add a rule in the Routing rules column.
- In the Add a routing rule window that opens, enter myRoutingRule for the Rule name.
- A routing rule requires a listener. On the Listener tab within the Add a routing rule window, enter the following values for the listener:
Listener name: Enter myListener for the name of the listener.
Frontend IP: Select Public to choose the public IP you created for the frontend. Accept the default values for the other settings on the Listener tab, then select the Backend targets tab to configure the rest of the routing rule.
- On the Backend targets tab, select myBackendPool for the Backend target.
- For the HTTP setting, select Create new to create a new HTTP setting. The HTTP setting will determine the behaviour of the routing rule. In the Add an HTTP setting window that opens, enter myHTTPSetting for the HTTP setting name. Accept the default values for the other settings in the Add an HTTP setting window, then select Add to return to the Add a routing rule window.
- On the Add a routing rule window, select Add to save the routing rule and return to the Configuration tab.
- Select Next: Tags and then Next: Review + create. Review the settings on the Review + create tab, and then select Create to create the virtual network, the public IP address, and the application gateway. It may take several minutes for Azure to create the application gateway. Wait until the deployment finishes successfully before moving on to the next section.
Add Backend Targets
In this example, you’ll use virtual machines as the target backend. You can either use existing virtual machines or create new ones. You’ll create two virtual machines that Azure uses as backend servers for the application gateway.
- Select All resources, and then select myAppGateway.
- Select Backend pools from the left menu.
- Select myBackendPool.
- Under Targets, select Virtual machine from the drop-down list.
- Under VIRTUAL MACHINE and NETWORK INTERFACES, select the TestVM and TestVM2 virtual machines and their associated network interfaces from the drop-down lists.
- Select Save.
- Wait for the deployment to complete before proceeding to the next step.
Create a Host A record in the DNS server
- Log on the Domain Controller Add a CNAME record to the corresponding Host A record of server.
- Add a Host A record in the public DNS server to the corresponding public IP address of the Application Gateway.
Test the application gateway
Copy the public IP address or FQDN, and then paste it into the address bar of your browser.
Check the response. A valid response verifies that the application gateway was successfully created and can successfully connect with the backend.
Hello
Sorry but what does this mean? “The next of the public IP address range of the Application Gateway must be specified as “Internet.”
it would be great if you could include screenshots in your above step-by-step 😀
Azure Application Gateway supports both HTTP and HTTPS protocol deployments, which allows you to easily deploy your application as a single unit. You can also use custom protocols on each port, such as TCP or UDP; Azure Application Gateway handles the plumbing for you.