Some of us have already worked with PowerShell and love it, while others seem to be confused and wonder how can one remember so many commands to get things done. Maybe its time we break it down for the guys who find it difficult to work with and show them how powerful it is when dealing with every day tasks related to SharePoint – for both Admins and Developers.
What is PowerShell
Its a scripting language and very similar to batch jobs which are simply plain-text files that execute through a console application to achieve automation tasks on a machine.
I have heard a few people referring to it as a tool or framework and i disagree with this approach. Lets just keep PowerShell a simple plain human-readable language.
What does it contain, where do we write it and how do we run it
It contains logic loops, variable, methods and other entities from the programming world.
The scripts can be written using any text editor and i usually write my PowerShell scripts using Notepad++ and then save it as a plain-text file having a .ps1 extension. To run the scripts you can initiate PowerShell console session and its basically the command-line console with blue as background color and text in white. You can always change the background color to suit your needs.
The following line will print a line of red text on a yellow background:
Write-Host “See how cool this is?” -Backgroundcolor
orange -Foregroundcolor black
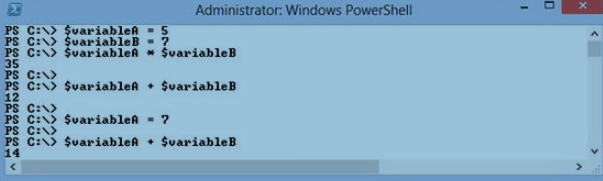
The console keeps the various variable declarations in memory for the entire duration of the PowerShell session. The image below shows you a fairly simple PowerShell session in which variables have been declared and are remembered throughout the execution of the various commands. It starts by declaring two variables, variableA and variableB, whose values will later be reused to perform mathematical operations. The script continues by changing the value of one of the two variables already declared and rerunning the same addition operation to get a different result based on the new value entered.
What has a Developer or Admin got to do with it
PowerShell is built on top of the Microsoft .NET stack, it can also reuse any graphical interface component that .NET has to offer. PowerShell scripts can also make use of external .NET assemblies, which, to us, is what really brings the scripting to the next level. So lets say that developers in your organization have developed a .NET utility that exposes a bunch of methods that are to be used by various .NET applications and services in your organization. If the methods contained in the resulting assemblies are publicly exposed, meaning that any external process can access them, then PowerShell can leverage the functionality inside these utilities for scripting purpose.
It is common to find a clear distinction between the developers and the administrators. Developers create new modules and functionalities for systems, and administrators are responsible for implementing and deploying them to production environments. Administrators are also normally in charge of configuring and maintaining the environments where these solutions have been deployed. In many cases, developers create solutions without really grasping what their solution will imply for configuration. They give the administrators the instructions to implement their product, and off they go. Even in the SharePoint world, this is often the case.
I have come across several organizations where the Administrator has to spend several hours to just get a simple thing done because he doesn’t know PowerShell and no one cared to provide him the relevant application architecture. Lets say if a development team creates a new web part that needs to be added to all existing webs in an environment and the environment includes 100 web pages spread across multiple site
collections?
To think that someone is going to go through each of these and manually add the web part is pure craziness. This type of situation highlights the need for a solution that would let the administrators responsible for implementing solutions automate tasks in a repeatable fashion.
PowerShell Glossary
Cmdlets – Pronounced “command-lets,” these represent the set of methods that are available in the current session. They are normally written in the form of verbobject (for example, Get-SPSite, Set-ExecutionPolicy, Delete-SPListItem, and so on).
Installing and Deploying SharePoint 2016 with PowerShell
I will try to cover how to automate the installation of the following aspects of a new SharePoint farm:
- Installation and configuration of the Server Operating System’s roles and features
- Installation and configuration of SQL Server
- Installation of the SharePoint prerequisites
- Installation of the SharePoint core components
- Configuration of your new SharePoint Farm
The SharePoint Farm environment will be “self-contained,” meaning that all required components will be installed on a single box. In real-life scenarios, you’ll always want to offload the domain controller role to a separate server as well as have your SQL Server installation hosted elsewhere. SharePoint 2016 also gives us more flexibility than its predecessors, by allowing us to assign predefined roles to our servers to ensure that the proper services are run on the appropriate server. Components like the workflow engine, machine translation, and search services would normally be installed on external application servers in order to keep the SharePoint Web front-end servers as lightweight as possible. Please note that the end-goal architecture mentioned below is for learning purposes only, and should not be something you aim to replicate in a production environment.
1. Domain Controller
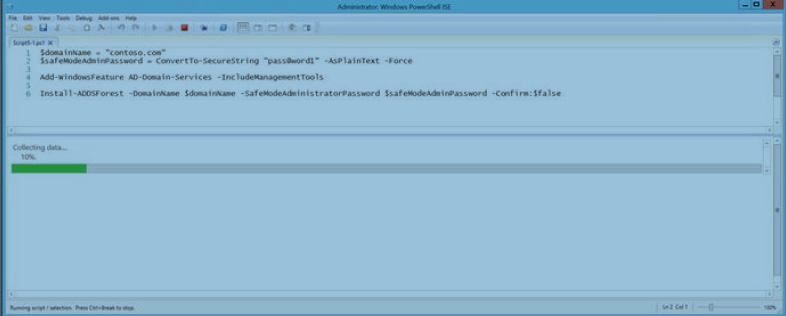
This role is probably the most important one and remember that your SharePoint 2016 machine will be self-contained; therefore, it needs to host its own domain. PowerShell in Windows Server 2012 R2 provides us with a set of various cmdlets that allow us to interact directly with the various Active Directory components. The following script excerpt will configure the domain controller role on the server environment .
NOTE: The scripts that i have used below contain passwords that are exposed in plain text. This is not considered to be best practice, and you should always be careful how you expose sensitive information in your scripts.
$domainName = “contoso.com”
$safeModeAdminPassword = ConvertTo-SecureString “pass@word1” -AsPlainText -ForceAdd-WindowsFeature AD-Domain-Services -IncludeManagementTools
Install-ADDSForest -DomainName $domainName -SafeModeAdministratorPassword $safeModeAdminPassword -Confirm:$false
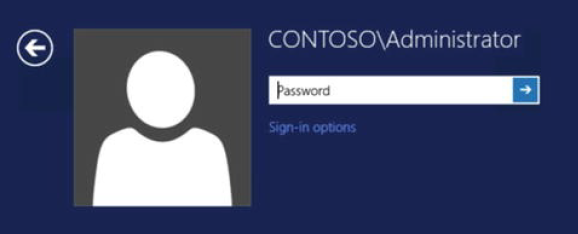
After the script, the machine will automatically reboot to ensure that new configuration takes effect. After the reboot you will see the following Login screen.
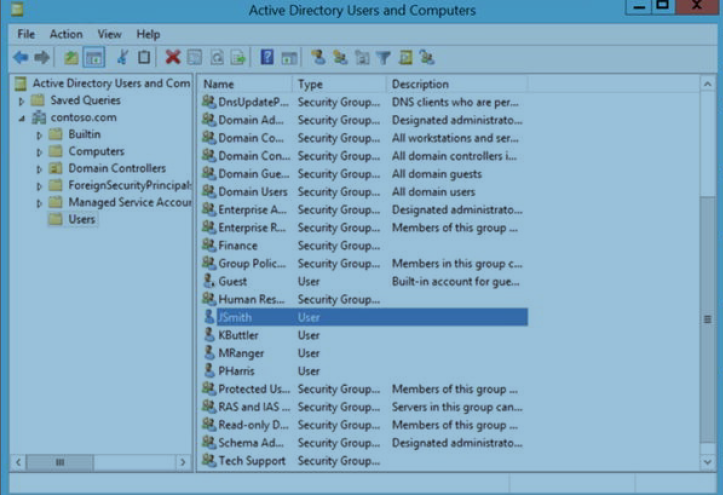
2. Users & Groups
Now we will create some test users and groups in our new Active Directory through PowerShell to represent the following functional business units:
- Administration
- Finance
- Human Resources
- Directors
- Tech Support
Below is the PowerShell script for creating these groups.
New-ADGroup -DisplayName "Administration" -GroupScope DomainLocal -Name "Administration" New-ADGroup -DisplayName "Finance" -GroupScope DomainLocal -Name "Finance" New-ADGroup -DisplayName "Human Resources" -GroupScope DomainLocal -Name "Human Resources" New-ADGroup -DisplayName "Directors" -GroupScope DomainLocal -Name "Directors" New-ADGroup -DisplayName "Tech Support" -GroupScope DomainLocal -Name "Tech Support"
Now we will create a user for each security group using the following script. The default password for each of these users will be pass@word1.
$usersPassword = ConvertTo-SecureString
"pass@word1" -AsPlainText -Force
New-ADUser -Name "JSmith" -GivenName "John" -
Surname "Smith" -AccountPassword $usersPassword -
UserPrincipalName "[email protected]" -DisplayName
"John Smith"
Enable-ADAccount -Identity "JSmith"
Add-ADGroupMember -Identity "Administration" -
Member "JSmith"
New-ADUser -Name "BMoores" -GivenName "Bob" -
Surname "Moores" -AccountPassword $usersPassword -
UserPrincipalName "[email protected]" -DisplayName
"Bob Moores"
Enable-ADAccount -Identity "BMoores"
Add-ADGroupMember -Identity "Finance" -Member
"BMoores"
New-ADUser -Name "PHarris" -GivenName "Peter" -
Surname "Harris" -AccountPassword $usersPassword -
UserPrincipalName "[email protected]" -DisplayName
"Peter Harris"
Enable-ADAccount -Identity "PHarris"
Add-ADGroupMember -Identity "Human Resources" -
Member "PHarris"
New-ADUser -Name "KButtler" -GivenName "Kyle" -
Surname "Buttler" -AccountPassword $usersPassword -
UserPrincipalName "[email protected]" -DisplayName
"Kyle Buttler"
Enable-ADAccount -Identity "KButtler"
Add-ADGroupMember -Identity "Directors" -Member
"KButtler"
New-ADUser -Name "MRanger" -GivenName "Mike" -
Surname "Ranger" -AccountPassword $usersPassword -
UserPrincipalName "[email protected]" -DisplayName
"Mike Ranger"
Enable-ADAccount -Identity "MRanger"
Add-ADGroupMember -Identity "Tech Support" -Member
"MRanger"
3. Application Server Role
SharePoint 2016 requires your server to have the Application Server roles enabled to leverage many .NET features, such as the Windows Communication Foundation for web service calls. Besides activating this role, there are several specific features that also need to be turned on in order for SharePoint to install properly.
PwerShell Script
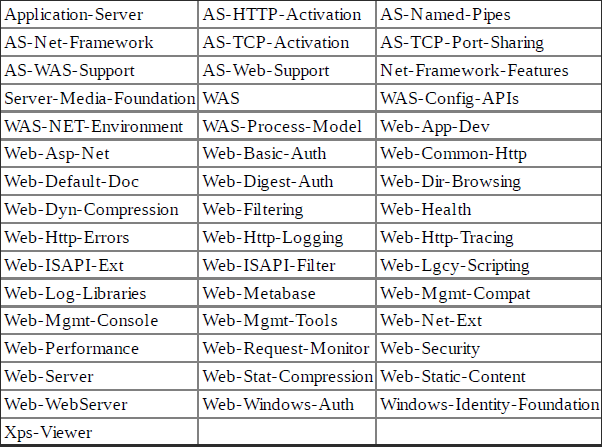
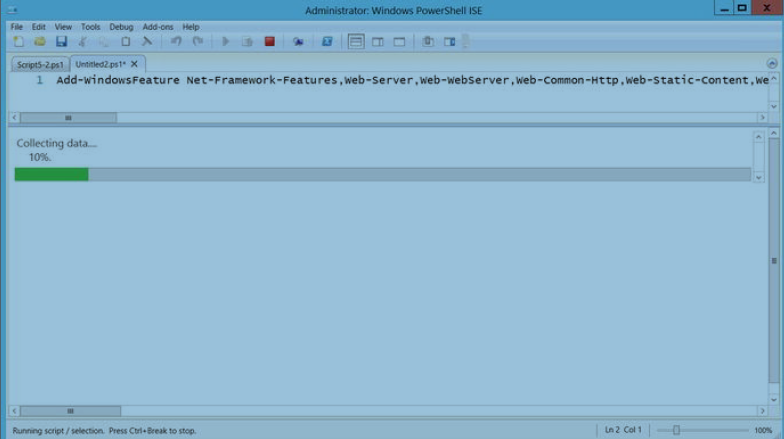
Add-WindowsFeature Application-Server, AS-HTTP-Activation, AS-Named-Pipes, AS-Net-Framework, AS-TCP-Activation, AS-TCP-Port-Sharing, AS-WAS-Support, AS-Web-Support, Net-Framework-Features, Server-Media-Foundation, WAS, WAS-Config-APIs, WAS-NET-Environment, WAS-Process-Model, Web-App-Dev, Web-Asp-Net, Web-Basic-Auth, Web-Common-Http, Web-Default-Doc, Web-Digest-Auth, Web-Dir-Browsing, Web-Dyn-Compression, Web-Filtering, Web-Health, Web-Http-Errors, Web-Http-Logging, Web-Http-Tracing, Web-ISAPI-Ext, Web-ISAPI-Filter, Web-Lgcy-Scripting, Web-Log-Libraries, Web-Metabase, Web-Mgmt-Compat, Web-Mgmt-Console, Web-Mgmt-Tools, Web-Net-Ext, Web-Performance, Web-Request-Monitor, Web-Security, Web-Server, Web-Stat-Compression, Web-Static-Content, Web-WebServer, Web-Windows-Auth, Windows-Identity-Foundation, Xps-Viewer –Source:E:\source\sxs\
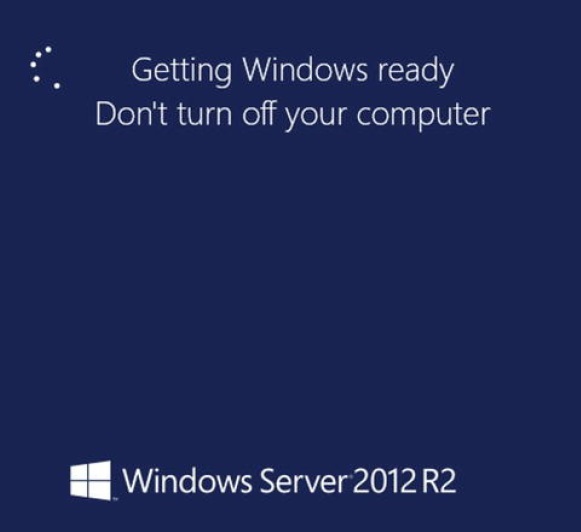
After the script finishes, you will need to restart the machine so type in >>>
Restart-Computer
Applying the prerequisite features on restarting
4. Installing SQL Server 2014
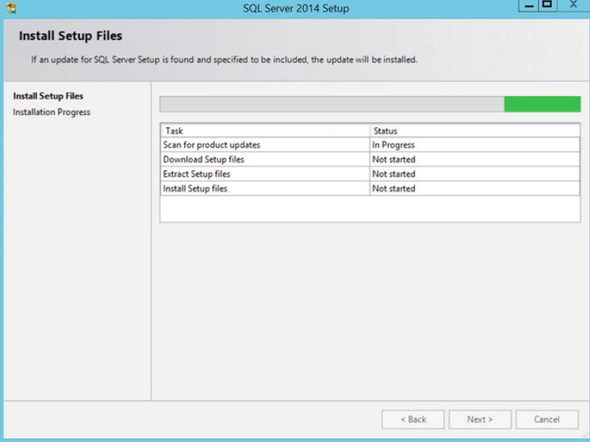
Before you can properly install the required components of SQL Server 2014, you will need to enable the following roles on the server. The scripts assume that you have the SQL installation components loaded on a drive mapped to D:\. You will be doing a minimal installation of a default SQL standalone instance, installing only the Database Engine Services core bits. The following script will perform an unattended installation of SQL Server:
$sqlSAPassword = "pass@word1" $sqlProcess = new-object System.Diagnostics.Process $sqlProcess.StartInfo.Filename = "D:\setup.exe" $sqlProcess.StartInfo.Arguments = "/QS /ACTION=install /IACCEPTSQLSERVERLICENSETERMS=1 /FEATURES=SQL /INSTANCENAME=MSSQLSERVER /INSTANCEID=MSSQLSERVER /SQLSYSADMINACCOUNTS=contoso\Administrator /SECURITYMODE=SQL /SAPWD=$sqlSAPassword /INDICATEPROGRESS /AGTSVCSTARTUPTYPE=Automatic /TCPENABLED=1" $sqlProcess.Start() $sqlProcess.WaitForExit()
During the installation process, you will see several installation windows appear but you do not have to interact with any of them. The parameters passed to the setup executable will automatically fill in the appropriate information required for your installation.
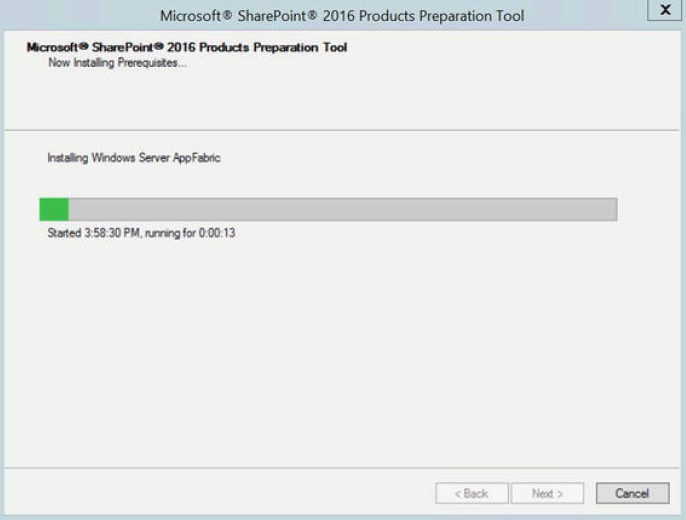
5. Installing SharePoint Prerequisites
The first step to installing SharePoint will be to download and install all of its prerequisites. You will be creating an automated PowerShell script that will automatically download each of them locally, and install them one at a
time. The following list contains all the prerequisites that are required for the SharePoint Core installer to work:
- Microsoft SQL Server 2008 R2 SP1 Native Client
- Microsoft Sync Framework Runtime v1.0 SP1 (x64)
- Windows Server AppFabric
- Cumulative Update Package 1 for Microsoft AppFabric 1.1 for Windows Server (KB2671763)
- Windows Identity Foundation (KB974405)
- Microsoft Identity Extensions
- Microsoft Information Protection and Control Client
- Microsoft WCF Data Services 5.0
To download each of the required files, simply use the Invoke-WebRequest PowerShell cmdlet. The method takes two input parameters: the URL of the source file to download, and the local path in which to save the file.
This method can be called in the following:
$webClient = New-Object "System.Net.WebClient"
$webClient.DownloadFile("http://<source file
URL>","c:\<local path>\<filename>" )
The automated script that you will create will have a list of all the prerequisite file URLs stored in an array. It will loop through each of them and download them locally. Once all of the files have been downloaded locally, the
script will call the SharePoint 2016 Products Preparation Tool, passing it the list of prerequisite files as an argument.
Unattended Sharepoint 2016 prerequisites installation
$LocalPath = "C:\SP2016Prereqs"
New-Item -ItemType Directory -Force -Path
$localPath
# Array with all urls...a bit messy
$files =
@("https://download.microsoft.com/download/9/1/3/91387
73A-505D-43E2-AC08-
9A77E1E0490B/1033/x64/sqlncli.msi","https://download.m
icrosoft.com/download/D/7/2/D72FD747-69B6-40B7-875BC2B40A6B2BDD/
Windows6.1-KB974405-x64.msu", "
http://download.microsoft.com/download/0/1/D/01D06854-
CA0C-46F1-ADBAEBF86010DCC6/
rtm/MicrosoftIdentityExtensions-64.msi",
" http://download.microsoft.com/download/E/0/0/E0060D8F-
2354-4871-9596-DC78538799CC/Synchronization.msi",
"http://download.microsoft.com/download/A/6/7/A678AB47
-496B-4907-B3D4-
0A2D280A13C0/WindowsServerAppFabricSetup_x64.exe",
"http://download.microsoft.com/download/7/B/5/7B51D8D1
-20FD-4BF0-87C7-4714F5A1C313/AppFabric1.1-RTMKB2671763-
x64-ENU.exe",
"https://download.microsoft.com/download/3/C/F/3CF781F
5-7D29-4035-9265-C34FF2369FA2/setup_msipc_x64.exe",
"https://download.microsoft.com/download/1/C/A/1CAA41C
7-88B9-42D6-9E11-
3C655656DAB1/WcfDataServices.exe","https://download.mi
crosoft.com/download/E/2/1/E21644B5-2DF2-47C2-91BD-
63C560427900/NDP452-KB2901907-x86-x64-AllOS-ENU.exe",
"http://download.microsoft.com/download/2/E/6/2E61CFA4
-993B-4DD4-91DA-3737CD5CD6E3/vcredist_x64.exe",
"http://download.microsoft.com/download/C/6/9/C690CC33
-18F7-405D-B18A-0A8E199E531C/Windows8.1-KB2898850-
x64.msu")
$fileName = ""
$pathParts
foreach($file in $files)
{
$pathParts = $file.Split("/")
$fileName = $pathParts[$pathParts.Length -1]
$fullName = "$localPath\$fileName"
Invoke-WebRequest $file -OutFile $fullName
}
$prereqProcess = new-object
System.Diagnostics.Process
$prereqProcess.StartInfo.Filename =
"F:\prerequisiteinstaller.exe"
$prereqProcess.StartInfo.Arguments =
"/SQLNCli:$LocalPath\sqlncli.msi
/IDFX:$LocalPath\Windows6.1-KB974405-x64.msu
/IDFX11:$LocalPath\MicrosoftIdentityExtensions-64.msi
/Sync:$LocalPath\Synchronization.msi
/AppFabric:$LocalPath\WindowsServerAppFabricSetup_x64.
exe /KB2671763:$LocalPath\AppFabric1.1-RTM-KB2671763-
x64-ENU.exe
/MSIPCClient:$LocalPath\setup_msipc_x64.exe
/WCFDataServices56:$LocalPath\WcfDataServices.exe
/DotNet452:$LocalPath\NDP452-KB2901907-x86-x64-AllOSENU.
exe /MSVCRT12:$LocalPath\vcredist_x64.exe
/KB2898850:$LocalPath\Windows8.1-KB2898850-x64.msu
/unattended"
$prereqProcess.Start()
$prereqProcess.WaitForExit()
Once it is completed, you will need to reboot the machine. After your machine has finished restarting, it will be properly configured and ready to receive the SharePoint installation.
6. Installing SharePoint 2016
The SharePoint 2016 installation media already contain a few predefined configuration files to help us do an unattended installation of the product. Unfortunately, each of them requires you to manually specify your product key before it can complete. The configuration files are nothing more than short XML files located under the /files/ folder at the root of the media. In order to get your unattended installation working, you will need to copy the setupfarmsilent configuration file locally on drive C:\, modify it to include your product key, and then execute the installation process by referencing the newly modified configuration file:
$productKey = "XXXXX-XXXXX-XXXXX-XXXXX-XXXXX" #
Replace with your own
$spLocalPath = "C:\SP2016\"
$spConfigFile = $spLocalPath + "config.xml"
New-Item -ItemType Directory -Force -Path
$spLocalPath
Copy-Item F:\files\setupfarmsilent\config.xml
$spLocalPath
$configContent =
[io.file]::ReadAllText($spConfigFile)
Get-ChildItem $spConfigFile -Recurse |
Where-Object {$_.GetType().ToString() -eq
"System.IO.FileInfo"} |
Set-ItemProperty -Name IsReadOnly -Value $false
$configContent = $configContent -Replace "<!--", ""
$configContent = $configContent -Replace "-->", ""
$configContent = $configContent -Replace "Enter
Product Key Here", $productKey
$configContent = $configContent -Replace
"""none""", """basic"""
$configContent | Out-File $spConfigFile
This script takes care of copying the configuration file locally by creating a folder on your C:\ drive, and creating a copy of the XML configuration file used by SharePoint to install all of its components. Open the newly copied file, and modify its content to include your own product key for SharePoint 2016. As the script indicates, please replace the generic product key provided with the your installation media or MSDN subscription. Next, initiate a new process that will execute the SharePoint 2016 installation wizard in silent mode (no graphical interfaces) by referencing the XML configuration file that you have just created locally with the previous script.
$spProcess = new-object System.Diagnostics.Process $spProcess.StartInfo.Filename = "F:\setup.exe" $spProcess.StartInfo.Arguments = "/config C:\SP2016\config.xml" $spProcess.Start() $spProcess.WaitForExit()
Configuring SharePoint 2016 Farm
Now its time to configure the farm and we will be doing it with PowerShell to create various DBs and service instances for SharePoint .
Creating the Databases
If you have previously installed SharePoint 2010 / 2013, you must have noticed that SharePoint Products Configuration Wizard, which is the default graphical tool to configure your SharePoint farm, adds a bunch of random numbers at the end of each database it creates. These numbers are referred to as a GUID, and are used by SharePoint to ensure that your databases are uniquely named because the tool doesn’t trust you to pick one yourself. With PowerShell you can have the right to make decisions and specify how you want these databases to be named. In the SharePoint world, there are three main types of database that every farm should have:
- Central Administration Content Database (referred to as the admin database): The admin database is where the information about the central administration site collection is stored. There will always only be a single instance of this database per SharePoint farm.
- Configuration Database (referred to as the config database): The config database stores information about all other SharePoint databases in the farm. It also keeps track of all custom solutions, webparts, web applications, site templates, and all other farm settings.
- Content Database: The content database, by contrast, can have multiple instances. It stores all information about a site collection in it. There could be more than one site collection stored in each content database.
The first database we will create is the config database because it is the main database keeping track of everything going in SharePoint farm, it makes sense to create this first. With the SharePoint cmdlets now available, you can call the New-SPConfigurationDatabase cmdlet to do the work. Calling this cmdlet will also automatically create an empty admin database that will act as a placeholder for the eventual Central Administration site collection. Starting with SharePoint 2016, the New-SPConfigurationDatabasePowershell cmdlet requires that we specify what MinRole to assign to our server. Because we are setting up a Single Server farm, we will need to specify to our PowerShell cmdlet that we wish to assign our server with the SingleServerFarm role. This is done by adding the – LocalServerRole SingleServerFarm parameters to the end of our command.
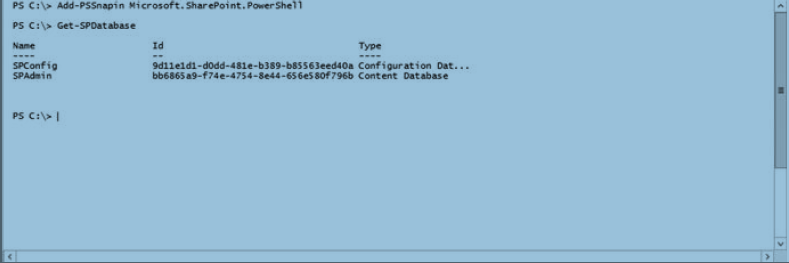
$spConfigDBName = "SPConfig" # Config DB name,
replace by your own;
$spAdminDBName = "SPAdmin" # Admin DB name, replace
by your own;
$spPassphrase = "pass@word1" # Recommendation is to
change this to something else;
$spFarmAdminPassword = "pass@word1" # replace by
your admin account password;
# Convert the provided Passphrase to a secure
string
$securePassphrase = ConvertTo-SecureString
$spPassphrase -asPlainText -force
# Convert the provided Admin account's password to
secure string and create a new PowerShell Credentials
object to represent the Administrator's account;
$secureAdminPassword = ConvertTo-SecureString
$spFarmAdminPassword -asPlainText -force
$spFarmAdmin = New-Object -TypeName
System.Management.Automation.PSCredential -
ArgumentList "contoso\administrator",
$secureAdminPassword
# Load the SharePoint PowerShell cmdlets
Add-PSSnapin Microsoft.SharePoint.PowerShell
New-SPConfigurationDatabase -DatabaseServer
$env:COMPUTERNAME -DatabaseName $spConfigDBName
-AdministrationContentDatabaseName $spAdminDBName -
Passphrase $securePassphrase -FarmCredentials
$spFarmAdmin –LocalServerRole SingleServerFarm
Once it is completed, you should be able to see that your two databases have been properly created on your server by using the SQL Server Management Studio tool.
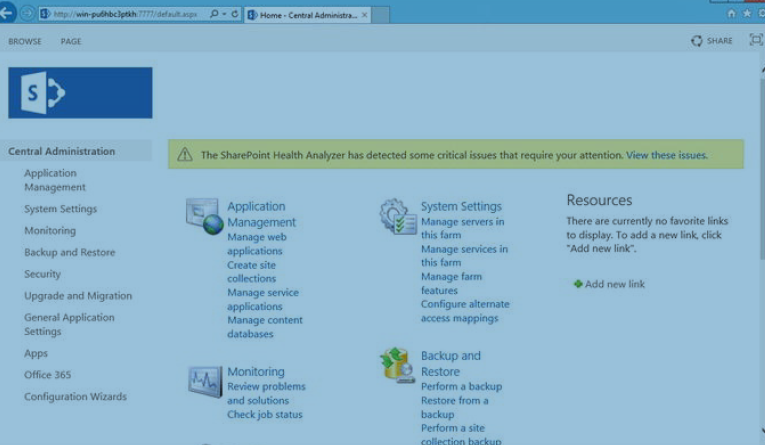
Configuring Central Admin
Now that your empty placeholder for Central Administration has been created (config database), go ahead and populate it with information about its site collection. It is normally a good practice to have your Central Administration site deploy on a nonstandard port that is higher than 999. The following script lets you specify what port number you’d like to use. My personal preference is to always use port 7777 for development farms. The execution of the PowerShell command should take about two minutes to execute.
$centralAdminPort = 7777
New-SPCentralAdministration -Port $centralAdminPort
-WindowsAuthProvider "NTLM"
Once the process has completed, your Central Administration site will be all ready for you to use. Open a new browser window on your machine, and navigate to http://localhost:7777/. You should be able to view and navigate throughout the various administrative sections of the site.
Creating your Web Application
New web applications in PowerShell are created by calling the New-SPWebApplication cmdlet. This requires you to specify the application’s name as well as the name of the Internet Information Services (IIS) application pool that will be associated with it. Each web application in SharePoint gets its own IIS application pool to manage its resources. In SharePoint 2016, the classic mode authentication has been deprecated, so you will need to define a new authentication provider so that your web application can use claims-based authentication. The script to have it created is the following:
$webAppPort = 80
$authProvider = New-SPAuthenticationProvider
$adminManagedAccount = Get-SPManagedAccount
"contoso\Administrator"
New-SPWebApplication -Name "Demo Gateway" -
ApplicationPool "DemoGatewayPool"
-ApplicationPoolAccount $adminManagedAccount -Port
$webAppPort -AuthenticationProvider $authProvider
Install-SPFeature -AllExistingFeatures -Force #
Active all required Farm Features
We will now create web application that will contain the site collections that we want to expose to the end users. My recommendation is to have your new web application created on port 80 to access and prevents you from having to remember what port it’s on. New web applications in PowerShell are created by calling the New-SPWebApplication cmdlet. This requires you to specify the application’s name as well as the name of the Internet Information Services (IIS) application pool that will be associated with it. Each web application in SharePoint gets its own IIS application pool to manage its resources.
In SharePoint 2016, the classic mode authentication has been deprecated, so you will need to define a new authentication provider so that your web application can use claims-based authentication.
$webAppPort = 80
$authProvider = New-SPAuthenticationProvider
$adminManagedAccount = Get-SPManagedAccount
"contoso\Administrator"
New-SPWebApplication -Name "Demo Gateway" -
ApplicationPool "DemoGatewayPool"
-ApplicationPoolAccount $adminManagedAccount -Port
$webAppPort -AuthenticationProvider $authProvider
Install-SPFeature -AllExistingFeatures -Force #
Active all required Farm Features
Creating Root Site Collection
We will create a root site collection in the SharePoint web application that we just created and SharePoint exposes several templates for creating new site collections out-of-the-box. To keep things simple we will use the Blank Site template, which will create a new site with the minimum set of features activated by default.
$blankSiteTemplate = Get-SPWebTemplate STS#1
New-SPSite -Url "http://localhost/" -Name "Home" -
Template $blankSiteTemplate -OwnerAlias
"contoso\administrator"
Once it is finished, open a new Internet Explorer window and navigate to http://localhost/ to ensure that your new site collection was properly created.
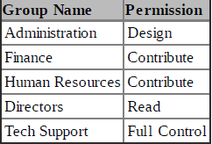
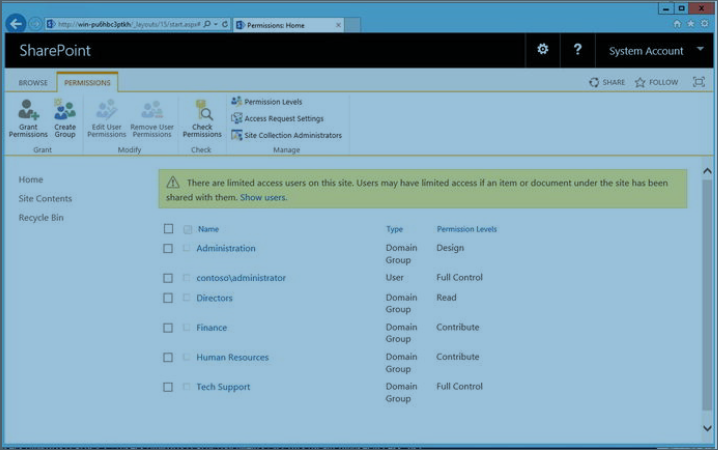
Granting Users Access
Its time to set permissions in our newly created SharePoint environment for the Users we created earlier. You will be granting permissions to the Active Directory groups instead of granting permissions to the users directly.
In SharePoint, before you can grant permission on a site to a user, you need to ensure that this user is registered against that site first. The SPWeb.EnsureUser() method ensures that a user is registered against a specific site and returns a reference to the user object.
$web = Get-SPWeb http://localhost
$user = $web.EnsureUser("Contoso\Administration")
Set-SPUser -Identity $user -web $web -
AddPermissionLevel "Design"
$user = $web.EnsureUser("Contoso\Finance")
Set-SPUser -Identity $user -web $web -
AddPermissionLevel "Contribute"
$user = $web.EnsureUser("Contoso\Human Resources")
Set-SPUser -Identity $user -web $web -
AddPermissionLevel "Contribute"
$user = $web.EnsureUser("Contoso\Directors")
Set-SPUser -Identity $user -web $web -
AddPermissionLevel "Read"
$user = $web.EnsureUser("Contoso\Tech Support")
Set-SPUser -Identity $user -web $web -
AddPermissionLevel "Full Control"
Ta-da
So we have learned how to setup and install SharePoint 2016 using PowerShell but we are still missing something. Our script is not automated and everything has to be manually run after each step, plus the machine requires reboot.
By just tweaking a little bit with Windows, you can easily achieve it and the next few paragraphs are only about it. Yes you can use PowerShell to write reboot instructions to the registry, and Windows will automatically read from these entries on rebooting.
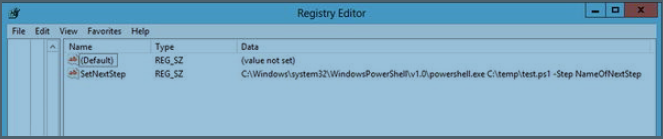
a. Writing to the Registry
PowerShell provides a very simple way of creating and modifying properties of registry keys in Windows. The Set-ItemProperty cmdlet takes as parameters the registry path of the key to add/modify, the name of the property, and its value.
Set-ItemProperty -Path <KeyPath> -Name “
<PropertyName>” -Value “<PropertyValue>”
As you’ve probably figured out by now, the cmdlet to remove a key’s property is Remove-ItemProperty, which only takes the key’s path and its name:
RemoveItemProperty -Path <KeyPath> -Name “
<KeyName>”
b. Automatic Login
We will work with WinLogon key, which allows you to specify credentials for Windows to use to automatically log on when the machine boots. This key is found at the following location in the registry:
HKLM:\SOFTWARE\Microsoft\WindowsNT\CurrentVersion\WinLogon
Remember that the computer will always attempt to log in as the specified user. If you want to get the default login screen prompting you for your credentials, you will need to clear this key’s properties first, or you can limit the number of times the automatic logon will happen by specifying the AutoLogonCount property.

To achieve a fully automated installation of SharePoint, encapsulate the code that sets the automatic logon key in a method for reusability. Each time you need the installation to reboot, you will make a call to this method to have the credentials set automatically on reboot.
Function AutoLogonAfterReboot
{
$WinLogonKey =
"HKLM:\SOFTWARE\Microsoft\Windows
NT\CurrentVersion\WinLogon"
Set-ItemProperty $WinLogonKey "DefaultUserName"
"Administrator"
Set-ItemProperty $WinLogonKey "DefaultPassword"
"pass@word1"
Set-ItemProperty $WinLogonKey "AutoAdminLogon"
"1"
Set-ItemProperty $WinLogonKey "AutoLogonCount"
"1"
Set-ItemProperty $WinLogonKey
"DefaultDomainName" "Contoso"
}
c. Script Orchestrator
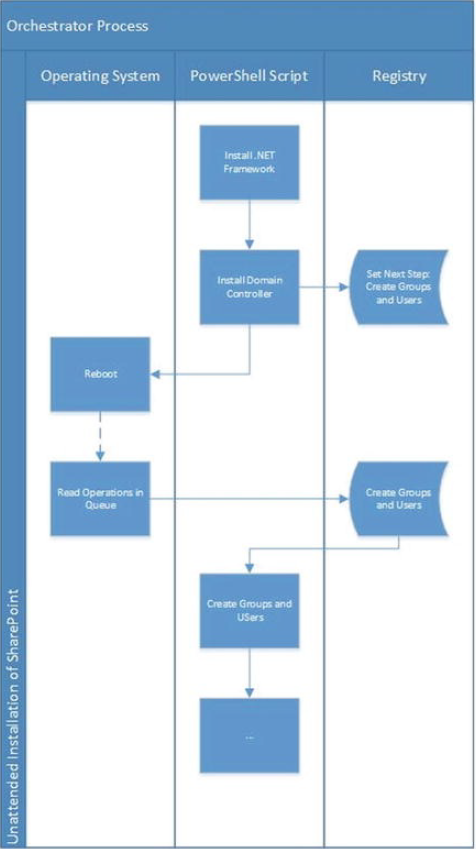
To put it simply, code that is used to determine what other piece of code to execute next is what is called Orchestrator. We will need this to develop and allow our installation process to decide when to execute next on restarting. Lets first set the registry key, after reboot windows will look at this to determine what needs to be executed next.
HKLM:\SOFTWARE\Microsoft\Windows\CurrentVersion\Run
This means the orchestrator will break down the installation into several logical execution steps (configure domain controller, install SQL Server, install the SharePoint prerequisites, and so on). It will allow users to specify, through a parameter, which step of execution they would like to call next, and it will execute the appropriate piece of code based on this parameter. Each execution step that requires the machine to reboot after completion will need to call your orchestrator to set the registry key, passing it the name of the next execution step. After the reboot is completed, PowerShell will automatically launch, call your installation script, and pass it the name of the next logical execution step to execute.
The orchestrator ’s code will need to have two main methods defined. One method will verify whether an execution step is the one that you should execute next, and the other will store the value of the next command to execute in the registry.
Lets wrap up each execution step in our PowerShell script in if statements and call the IsNextStep method on each one to decide whether or not to execute it.
if (IsCurrentStep "ASP.NET")
{
...
}
if (IsCurrentStep "DomainController")
{
SetNextStep $script "GroupsAndUsers" # Computer
will reboot after this line;
}
if (IsCurrentStep "GroupsAndUsers")
{
... # Execution will restart here after reboot;
SetNextStep $script "NextStepName" # Computer
will reboot after this line;
}
Here you go with automating the configuration of your SharePoint environment using PowerShell. I think i have tried my best to enable you to familiarize yourself with the SharePoint 2016 PowerShell cmdlets, as well as how to use them to interact with the SharePoint 2016 object model. PowerShell still has a lot to be covered and hopefully one day i will have enough time to shed some more light on what more can be learned about it.
Please make sure that you go through the links below as reference for the the scripts as it will ask you to fill in certain details regarding your environment, such as what port to install SharePoint Central Administration on, your administrator ’s account password, and so on. The script takes about an hour to execute and once finished, it will automatically open a new Internet Explorer window and navigate to your new SharePoint 2016 homepage.
References
New & Improved Features in SharePoint 2016
User Permissions & Permissions Level
New & Improved Features in SP 2016
Services Upgrade for SP 2016
Very well narrated Hammad !!!
It would be nice if you showed the actual PowerShell input so that one can see it typed in the right way.
Sure, Michael and i will keep that in mind for next time 🙂
Thanks for sharing
What a wonderful article! This is groove with useful information, and I can’t wait to delve in and receiver of the information the resources you’ve provided. Your pleasure is stimulating.